Wednesday, 31 October 2012

Monday, 22 October 2012
Top 100 Windows Tools Ultility (07.2012)

Top 100 Windows Tools Ultility (07.2012) | 1.24 GB
Anti-Malware tools
Audio and Video tools
Browsers and Plugins
CD ,DVD,iso,usb Tools
Compression and Backup
Download tools
File Transfer or sharing
Office and News
Photos and Images
System Tuning
DOWNLOAD:
http://lumfile.com/gw0opfho5eos/Top.100.Tooll_.rar.html
Audio and Video tools
Browsers and Plugins
CD ,DVD,iso,usb Tools
Compression and Backup
Download tools
File Transfer or sharing
Office and News
Photos and Images
System Tuning
DOWNLOAD:
http://lumfile.com/gw0opfho5eos/Top.100.Tooll_.rar.html
Friday, 12 October 2012
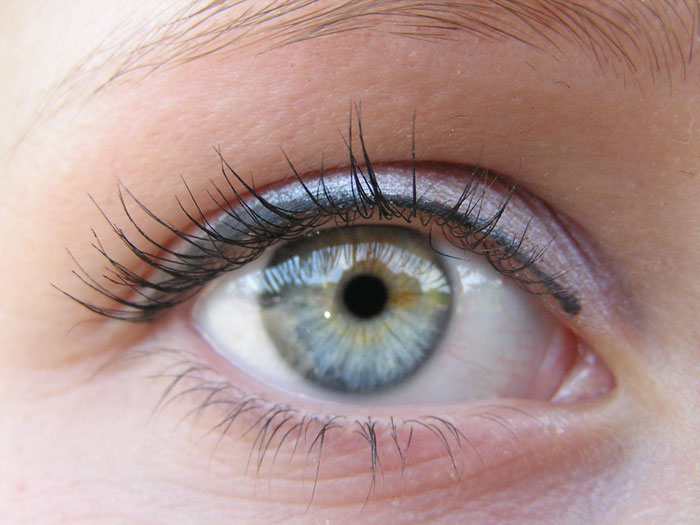
Make eyelashes thicker in Photoshop
Make eyelashes thicker
Transform this photo:

Into this one:

Step 1
Open our photo (you can download it from here)
Step 2
We will have to different layers for upper and lower eyelash because they are dissimilar and we are going to use two different methods for each of them. So make new layer (CTRL + N) and name it "upper". Go and pick Pen Tool (P on the keyboard). Use settings as in the picture below.

Now zoom in (you can use CTRL + + combination) on the upper eyelash and start drawing with pen tool. Our goal is to make our path as more similar to actual shape of eyelash as possible (don't be afraid, little practice and you'll see that this is not so hard at all). I always make 3 point when working on upper eyelash, because it is easier to adjust curves that way.
You make eyelashes mainly on places where actual eyelashes are thiner or where empty spaces between them exist. One more thing to remember and that is that eyelashes are not all the same thickness and color so be sure to change colors and brush size, but you'll see in next steps how I did that.
After making first eyelash shape with pen tool (I got it something like this)

click on Brush Tool and select size of brush and color. I choose size to be 2px and color something like #1e201b (you can use Picker Tool and choose your own selection of color). Now go to the Path palette, click Options,

then go to Stroke path

and select Brush tool and check Simulate pressure.

Click OK. Then repeat these steps and don't forget to change brush size (little steps) and color of brush.
Step 3
For now we have finished with upper eyelash and now is the time to go to lower eyelash. Make new layer and call it "lower". We will do almost the same procedure as on the upper eyelash. Only difference is the path shape. In previous step I used a 3 point path style but in this step I'll be using only 2 points to make an eyelash path, just like this one below.

HINT: You don't have to draw path for every eyelash. Use Direct Selection Tool (A), select any point on the path and then just drag that point where you want new eyelash!
Now, stroke as many eyelashes as you want.
Step 4
Because we stroke every eyelash with Brush tool we want to smooth a little bit edges of drawn eyelashes. So, click on "upper" layer and go to FILTER - BLUR - GAUSSIAN BLUR and set values as I did.

If you want you can use Blur Tool to blur just a little bit more those eyelashes to the left and right. Repeat same procedure for "lower" layer also. And for the final touch set Blending Mode for both layers to be Multiply. This will bring more black color to photo.
Step 5
This one is optional. If you want to remove those reflections in the eye use Healing Brush Tool (J) and gently remove those reflections in the eye. We had to do this in this photo but in yours it might not be the case.
Transform this photo:
Into this one:
Step 1
Open our photo (you can download it from here)
Step 2
We will have to different layers for upper and lower eyelash because they are dissimilar and we are going to use two different methods for each of them. So make new layer (CTRL + N) and name it "upper". Go and pick Pen Tool (P on the keyboard). Use settings as in the picture below.
Now zoom in (you can use CTRL + + combination) on the upper eyelash and start drawing with pen tool. Our goal is to make our path as more similar to actual shape of eyelash as possible (don't be afraid, little practice and you'll see that this is not so hard at all). I always make 3 point when working on upper eyelash, because it is easier to adjust curves that way.
You make eyelashes mainly on places where actual eyelashes are thiner or where empty spaces between them exist. One more thing to remember and that is that eyelashes are not all the same thickness and color so be sure to change colors and brush size, but you'll see in next steps how I did that.
After making first eyelash shape with pen tool (I got it something like this)
click on Brush Tool and select size of brush and color. I choose size to be 2px and color something like #1e201b (you can use Picker Tool and choose your own selection of color). Now go to the Path palette, click Options,
then go to Stroke path
and select Brush tool and check Simulate pressure.
Click OK. Then repeat these steps and don't forget to change brush size (little steps) and color of brush.
Step 3
For now we have finished with upper eyelash and now is the time to go to lower eyelash. Make new layer and call it "lower". We will do almost the same procedure as on the upper eyelash. Only difference is the path shape. In previous step I used a 3 point path style but in this step I'll be using only 2 points to make an eyelash path, just like this one below.
HINT: You don't have to draw path for every eyelash. Use Direct Selection Tool (A), select any point on the path and then just drag that point where you want new eyelash!
Now, stroke as many eyelashes as you want.
Step 4
Because we stroke every eyelash with Brush tool we want to smooth a little bit edges of drawn eyelashes. So, click on "upper" layer and go to FILTER - BLUR - GAUSSIAN BLUR and set values as I did.
If you want you can use Blur Tool to blur just a little bit more those eyelashes to the left and right. Repeat same procedure for "lower" layer also. And for the final touch set Blending Mode for both layers to be Multiply. This will bring more black color to photo.
Step 5
This one is optional. If you want to remove those reflections in the eye use Healing Brush Tool (J) and gently remove those reflections in the eye. We had to do this in this photo but in yours it might not be the case.
Sunday, 7 October 2012
Autodesk Maya 2013 SP2 (64 bit)

Autodesk Maya 2013 SP2 (64 bit) | 1.52GB
Autodesk ® Maya ® offers professionals implementing the through the creative process with a complete set of tools for 3D-animation, modeling, simulations, and visual effects, rendering, compositing and motion tracking based on easily expandable platform. Maya provides a comprehensive solution to cutting-edge tools for creating movies, computer games, television, printing and graphic design of the highest quality. Autodesk ® Maya ® 2013 offers a new set of tools for pre-visualization and creating game prototypes, advanced modeling capabilities and improved integration of business processes.
System requirements:
Operating System Microsoft Windows 7 Professional, Microsoft Windows Vista Business x64 Edition (SP2), Microsoft Windows XP Professional x64 Edition (SP2)
Windows: Intel Pentium 4, AMD Athlon instruction set with support for SSE3 (or higher)
4 GB of RAM
10 GB of free hard disk space
Graphics card with OpenGL hardware acceleration from the number of compatible
Three-button mouse driver installed
DVD-ROM drive
Browsers: Internet Explorer 8 (or higher), Safari or Firefox
Checksums:
CRC32: 7334A8F4
MD5: E506C387524F1CFC89A96C89F45C6246
SHA-1: 0436D33017690D24C852825631544C72BF62288C
The procedure for treatment:
Installation:
1. Run the installation program
2. After the program will configure, a new window
It click "Instal"
3. Accept "license agreement"
4. In the next window, enter the necessary information:
Serial numbers may be, for example, these: 666-69696969, 667-98989898, 400-45454545, 066-66666666 or 111-11111111
Product Key 657E1
5. In the next window select the components to install:
Here under the "spoiler" Hide advanced configuration settings.
After setting press "Install"
6. Install
After installation, a new window appears:
Click "Finish"
7. After installation, you may see a screen prompting you to restart.
- reboot is not mandatory, you can go to the activation Activation: - For use keygen activation of X-Force - For the activation does not require disabling the Internet! 1. Run the program. Initializes: 2. See the window of licensing: put the check and click the "I Agree" 3. A new window If you "Try", the program will run in trial mode. This mode has only one restriction - 30 days to activate, and then the button will become active, functional program has no restrictions. Click "Activate" 4. Regardless of which window will be next, close it and run the activation again. We turn again to the initial activation window (part 2) 5. In the window you want us to see is the code request ... Choose item "I have an activation code from Autodesk" 6. Run keygen: 7. Now the most important thing: - In keygen (domain «Request») copy the request code (Request code) from the window of activation of Autodesk; - click Generate. In the keygen-a (region «Activation») obtain the necessary code activation - the code is inserted into the activation window Autodesk. draw your attention to the fact that the code will be shorter than 7 characters - this is normal, "the way it should be!" Click " Next "and ... 8. A new window opens Click "Finish" 9. Run Mike And of course do not forget to buy the official version

Buy Premium To Support Me & Get Resumable Support & Max Speed
Extabit:
http://extabit.com/file/29fq4m7uvadhv/Autodesk.Maya.2013.SP2.64.bit.part1.rar
http://extabit.com/file/29fq4m7uup4n7/Autodesk.Maya.2013.SP2.64.bit.part2.rar
http://extabit.com/file/29fq4m7uvamxv/Autodesk.Maya.2013.SP2.64.bit.part3.rar
http://extabit.com/file/29fq4m7uqxhmb/Autodesk.Maya.2013.SP2.64.bit.part4.rar
Uploaded:
http://uploaded.net/file/zpexrstq/Autodesk.Maya.2013.SP2.64.bit.part1.rar
http://uploaded.net/file/6st3atjo/Autodesk.Maya.2013.SP2.64.bit.part2.rar
http://uploaded.net/file/3gukxhvs/Autodesk.Maya.2013.SP2.64.bit.part3.rar
http://uploaded.net/file/hlx3cx6w/Autodesk.Maya.2013.SP2.64.bit.part4.rar
Lumfile:
http://lumfile.com/yk1uyrc4adpk/Autodesk.Maya.2013.SP2.64.bit.part1.rar.html
http://lumfile.com/cvgcxc3dxyi6/Autodesk.Maya.2013.SP2.64.bit.part2.rar.html
http://lumfile.com/rpv83rkanbzk/Autodesk.Maya.2013.SP2.64.bit.part3.rar.html
http://lumfile.com/01seiz8txt9s/Autodesk.Maya.2013.SP2.64.bit.part4.rar.html
Friday, 5 October 2012
Usb Doctor 1 By Extrimu 10.07.2012 (x86/x64)
")
Usb Doctor 1 By Extrimu 10.07.2012 (x86/x64)
Extras. Info: Installation is as follows:
1 - open the downloaded folder, USB DOCTOR
2 - format the media utility hpusbfw
3 - run the GHOST-32 and extract the contents to the USB DOC.GHO media
4 - and the last run WinGrub vyberaem media press instal your multiboot flash drive.
Thats it - good luck!
Ingredients:
1.WinPE STEA Edition 03.2012
2.LEX Live STARTLEX DX Media 2011
3.Hiren s BootCD 15.1 (DOS Utils) Rus
4.Acronis True Image Home 2012 PP (Rus)
5.Fix NTLDR is missing
6.Passcape Reset Windows Password 1.2.1
Anti-Virus:
1.Kaspersky RD 10
2.AntiSMS LiveCD 2.4
3.Dr.Web LiveCD
4.ESET NOD32 LiveCD
System requirements:
� USB Flash Drive 4 GB
Download:
Mirror 1:
Mirror 2:
http://rapidgator.net/file/48330335/ud10712_ttt.rar.html
Subscribe to:
Comments (Atom)